Are you tired of managing a shared WiFi key that everyone knows, which you never dare to change for fear of having to reconfigure all your devices? The clean solution is WPA2-Enterprise—each user authenticates with their own Active Directory credentials, without ever entering a WiFi password. The domain-joined laptop connects automatically, transparently, as soon as the Ethernet cable is unplugged.
In this article, we'll transform an existing SSID into WPA2-Enterprise using NPS (Network Policy Server) as the RADIUS server, Active Directory for user management, and a GPO to automate the connection on domain laptops. We'll use Cisco Aironet access points in standalone mode.
Target architecture
Laptop (domain) → Cisco AP (WPA2-Enterprise) → NPS/RADIUS → Active Directory
                                                      ↓
                                          "User in GG_WIFI_RADIUS?"
                                                      ↓
                                              Access granted ✅
Prerequisites
- Windows Server with the NPS role installed
- An operational Active Directory domain
- An internal PKI (Active Directory Certificate Services) to issue the server certificate
- Cisco Aironet access points in standalone mode (IOS 15.x)
- A firewall/router that supports VLAN segmentation
- The target SSID already exists in WPA2-PSK
Network segmentation in our example
| Element | VLAN | Network |
|---|---|---|
| WiFi access points (management) | VLAN100 | 192.168.X.0/28 |
| NPS server | VLAN110 | 192.168.Y.0/24 |
| WiFi clients (laptops) | VLAN120 | 192.168.Z.0/24 |
Step 1 — Network prerequisites: allow RADIUS traffic
Before any configuration, you must ensure that the WiFi access points can communicate with the NPS server. The RADIUS protocol uses UDP/1812 (authentication) and UDP/1813 (accounting).
On your firewall, create a rule:
Source: VLAN100 (WiFi access points)
Destination: NPS server IP
Ports: UDP 1812, UDP 1813
Action: ACCEPT
NAT: OFF (never use NAT on internal traffic)
> ⚠️ Important: Since the firewall is stateful, the return rule (NPS → access points) is managed automatically. You do not need to create a rule in the other direction.
Step 2 — Server certificate on NPS
The PEAP protocol requires a server certificate on NPS to encrypt the authentication tunnel. We will request this certificate from our internal PKI — laptops in the domain will automatically trust it via AD.
On the NPS server, open an MMC console:
File → Add Snap-in → Certificates → Computer Account → Local Computer
Navigate to Certificates → Personal → right-click → All Tasks → Request New Certificate
Select the "RAS and IAS Server" template and click Enroll.
> 💡 If the template is unavailable: On the CA server, open certsrv.msc → Certificate Templates → Manage → find "RAS and IAS Server" → Properties → Security → add the NPS server machine account (SERVER-NPS$) with Read and Enroll permissions. Then return to certsrv.msc → Certificate Templates → New → Certificate Template to Issue → select "RAS and IAS Server."
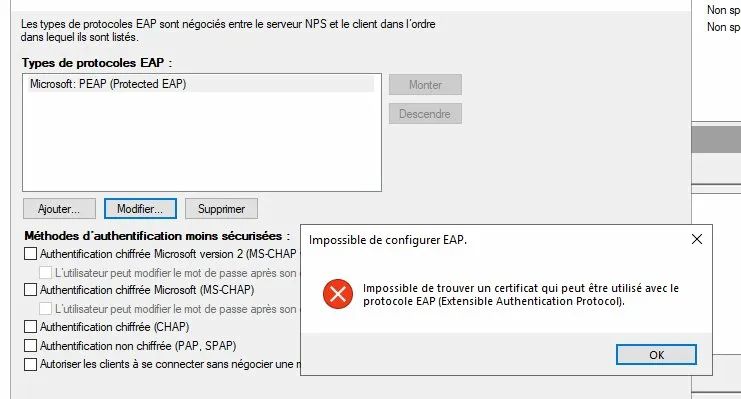
> ⚠️ Common error: If you try to configure PEAP without a certificate installed, NPS will display the error below. Do not proceed to the next step until the certificate is in place.
The certificate will renew automatically via AD auto-enrollment—no manual intervention required.
Step 3—Active Directory Preparation
Create the security group
In Active Directory Users and Computers, create a group:
- Name:
GG_WIFI_RADIUS - Type: Global security group
- Members: users authorized to connect to the corporate WiFi
> 💡 Use a Global group (not a Domain Local group) — NPS can evaluate global groups in its network policies.
Create a dedicated OU for laptops
If your laptops and desktops are in the same OU, create a dedicated sub-OU:
STATIONS
└── LAPTOPS   ← new sub-OU
Move the computer accounts for laptops to LAPTOPS. The WiFi GPO will only be applied to this OU — there is no need to push a WiFi profile to desktops.
Step 4 — NPS configuration
4.1 Declare access points as RADIUS clients
In the NPS console, navigate to RADIUS Clients and Servers → RADIUS Clients → New and create an entry for each WiFi access point:
| Field | Value |
|---|---|
| Friendly Name | AP-WIFI-01 |
| Address | Access point IP (e.g., 192.168.X.3) |
| Shared Secret | Strong password, without the characters ?, $, +, [ |
> ⚠️ Cisco warning: Standalone Cisco Aironet access points do not accept certain special characters in the shared secret. Use only letters, numbers, hyphens, and underscores. Limit the length to 12 characters maximum to avoid compatibility issues.
4.2 Create the WiFi network policy
In NPS → Policies → Network Policies → New:
Overview tab:
- Name:
WIFI-ENTERPRISE - Network Access Server Type:
Not Specified - Access Permission:
Grant Access
Conditions tab:
Windows Groups→ addGG_WIFI_RADIUSNAS Port Type→Wireless - IEEE 802.11
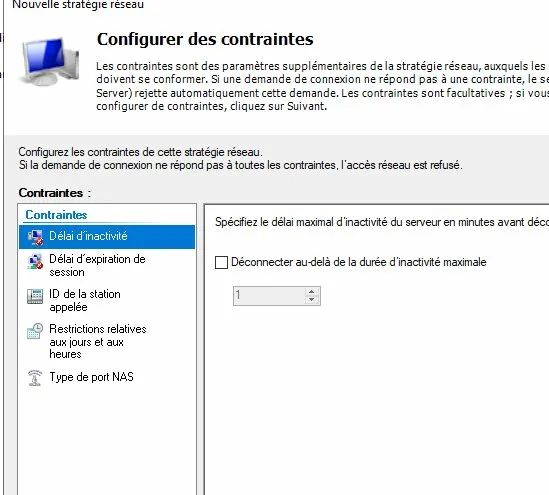
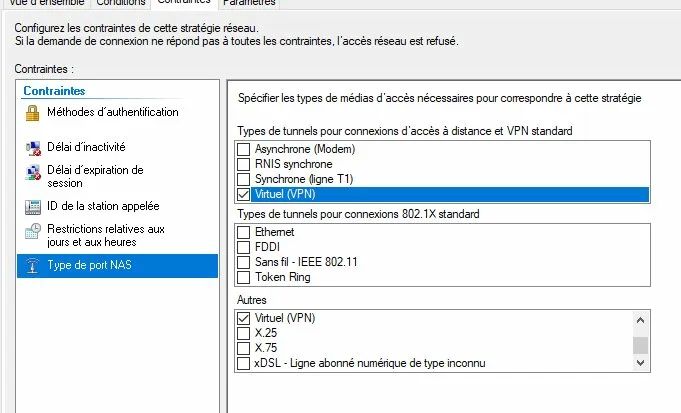
Constraints tab:
The Constraints tab allows you to configure time limits, time restrictions, and the NAS port type. Leave the default time limits and only configure the NAS Port Type:
Then, in Authentication Methods:
- Add Microsoft: PEAP (Protected EAP)
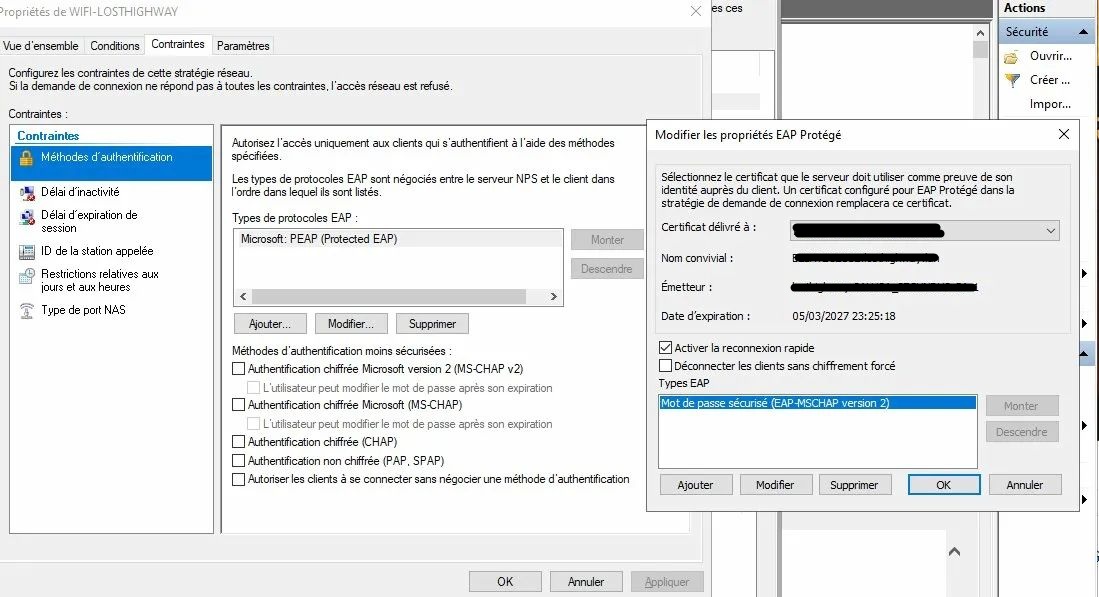
- Click Edit → select the NPS server certificate
- EAP Method:
Secure Password (EAP-MSCHAP version 2)
Once the certificate is correctly installed, the Protected EAP properties will appear as follows with the NPS server certificate selected:
Settings tab:
Before modification, the RADIUS attributes contain VPN-oriented values that need to be corrected:
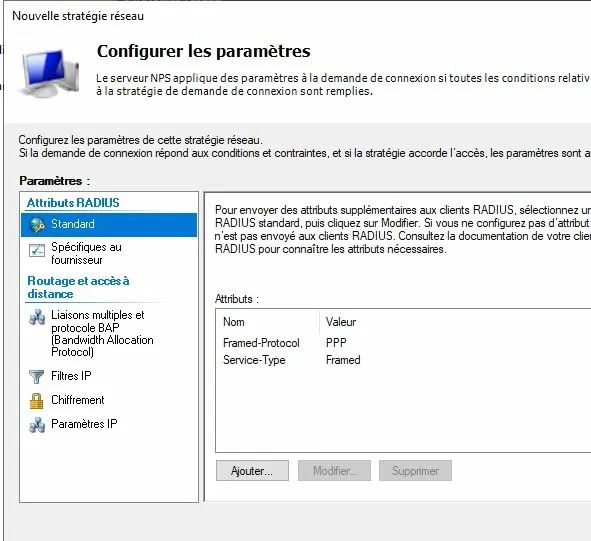
- Delete the
Framed-Protocolattribute - Change
Service-TypefromFramedtoLogin
4.3 Check the order of policies
NPS evaluates policies from top to bottom and stops at the first one that matches. Check that your WiFi policy is not masked by a more general policy:
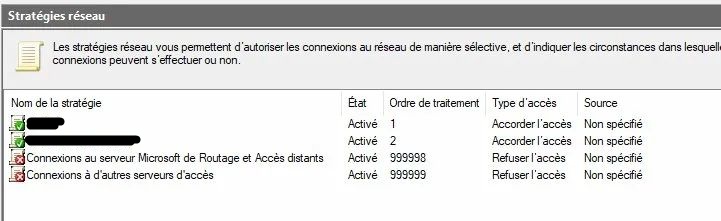
> ⚠️ Common pitfall: If you already have an NPS policy for the VPN, make sure it has a NAS Port Type → Virtual (VPN) condition in its Conditions (not just in the Constraints). Without this condition, it will intercept all RADIUS requests before your WiFi policy. Here is the correct configuration:
Step 5 — Configuring Cisco Aironet access points
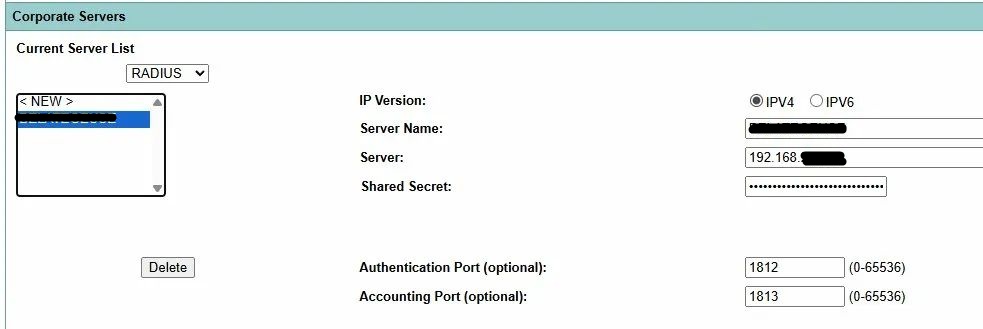
5.1 Declaring the RADIUS server
Log in to the access point's web interface → Security → Server Manager
In the Corporate Servers section, enter the NPS server information:
| Field | Value |
|---|---|
| Server Name | NPS-SERVER |
| Server | NPS server IP |
| Shared Secret | Same as the one entered in NPS |
| Authentication Port | 1812 |
| Accounting Port | 1813 |
Once validated, the server appears in the list:
Click Apply, then in Default Server Priorities → EAP Authentication → Priority 1 → select your NPS server.
5.2 Configure the SSID in WPA2-Enterprise
Security → SSID Manager → [your SSID]
The SSID Manager allows you to view and configure all your SSIDs with their associated VLAN and active radios:
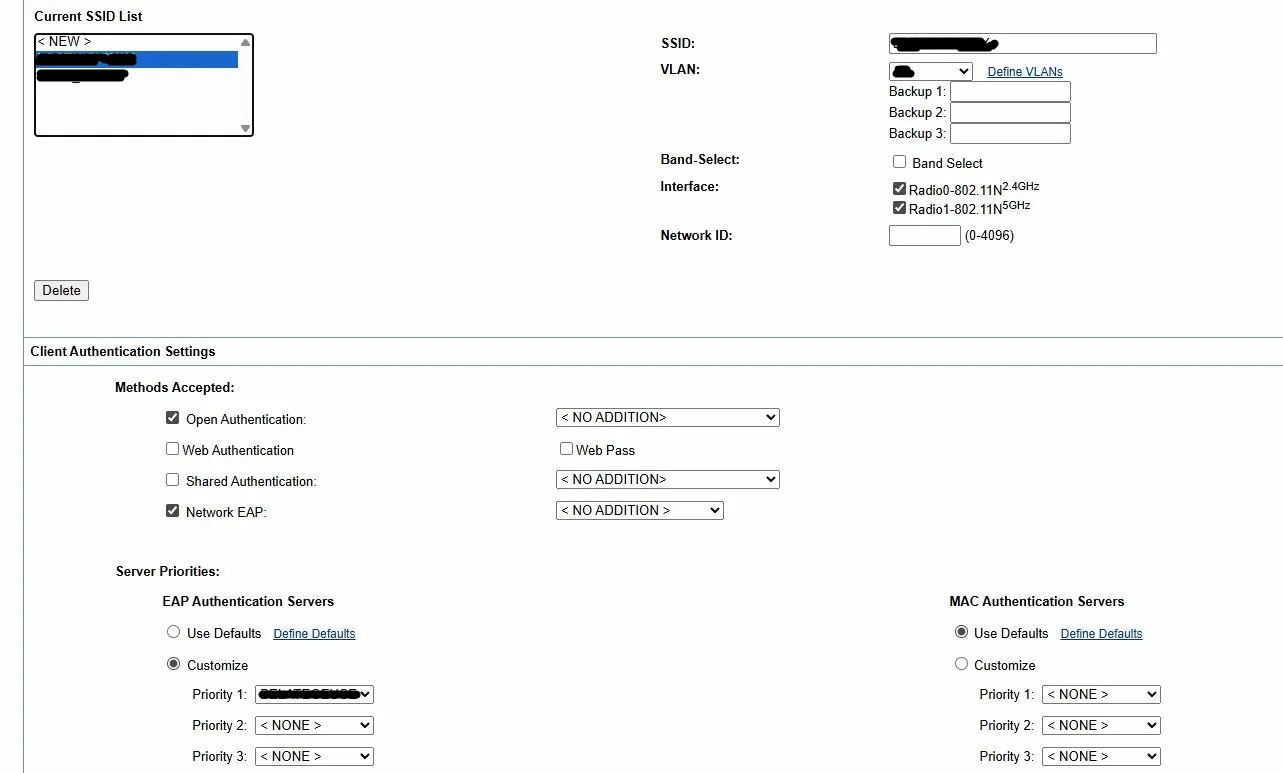
In Client Authentication Settings → Methods Accepted, here is the initial status before modification:
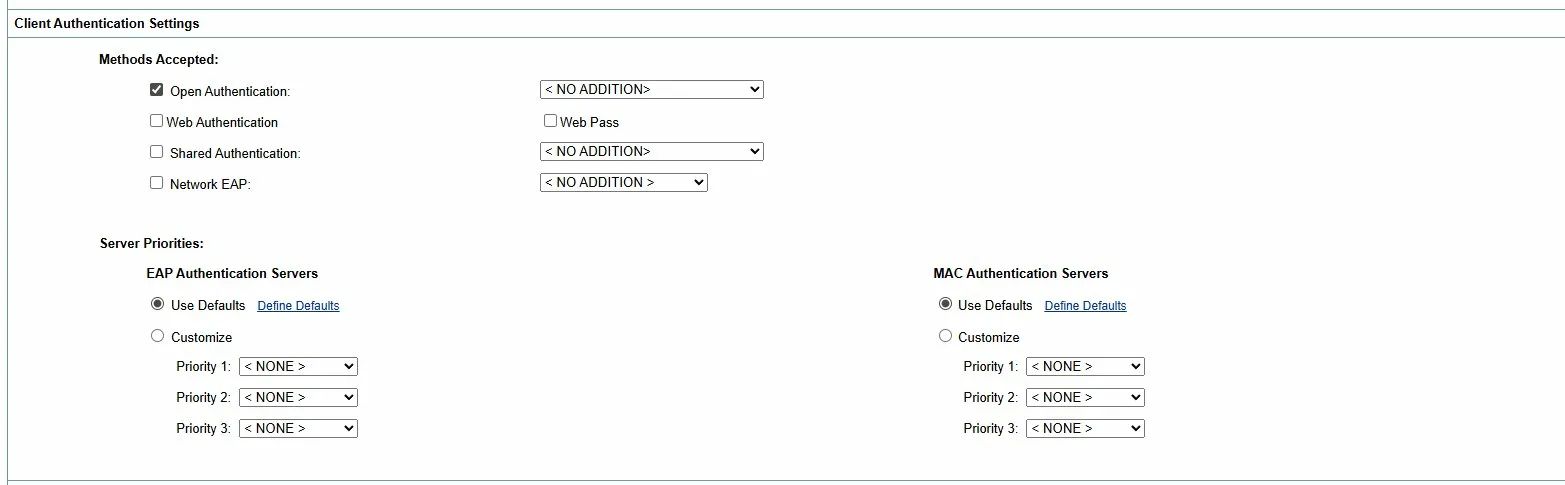
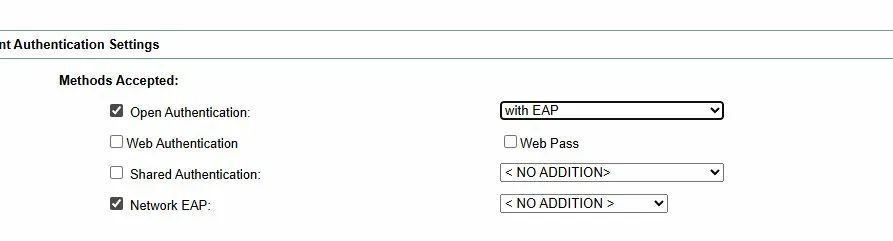
Modify as follows:
- ✅ Open Authentication → dropdown:
with EAP - ✅ Network EAP → dropdown:
< NO ADDITION >
> 💡 Cisco behavior: On standalone Aironets, Open Authentication must remain checked at the same time as Network EAP. This is counterintuitive, but it is how Cisco implements 802.1X — Open Authentication manages the 802.11 association, Network EAP manages EAP/RADIUS authentication. Both together = WPA2-Enterprise.
Here is the correct final configuration:
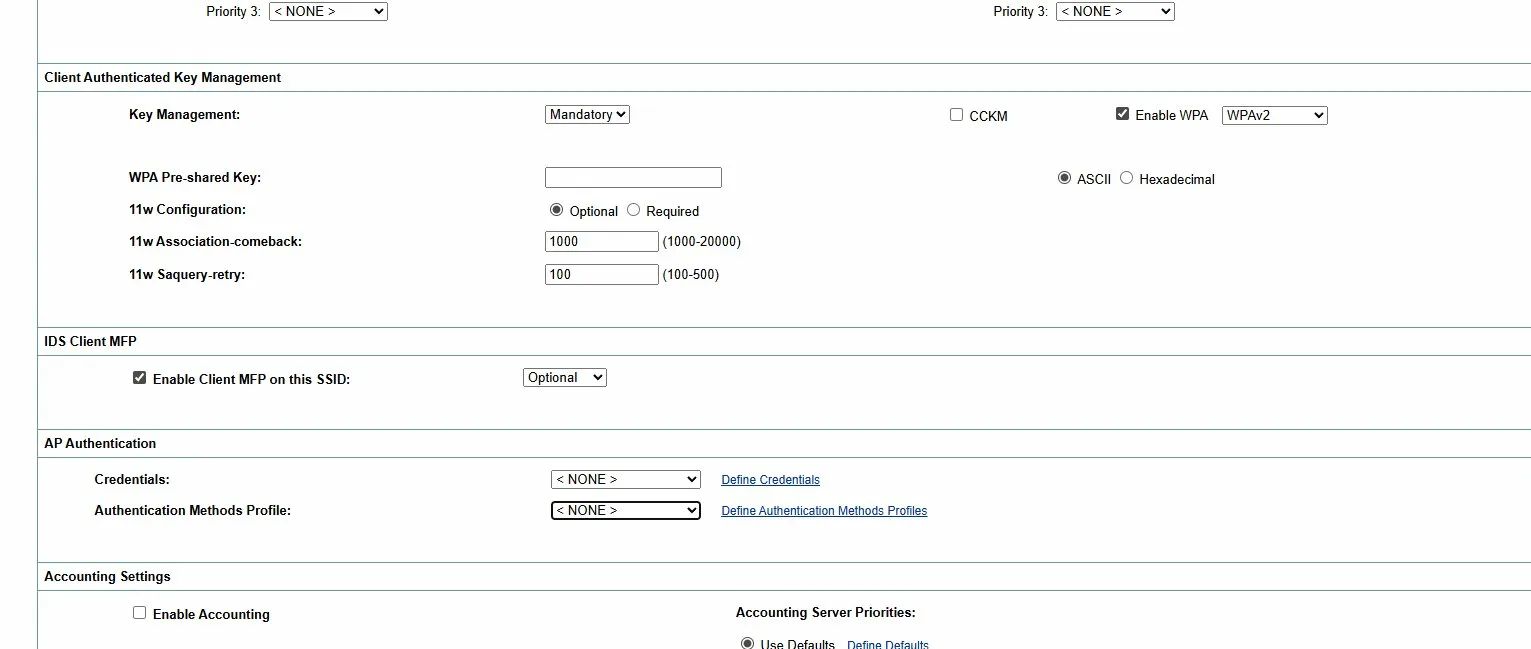
In Client Authenticated Key Management:
- Key Management:
Mandatory - Enable WPA:
WPA2(without dot11r if your clients have connection issues) - WPA Pre-shared Key: leave this field blank
In the AP Authentication section, create an EAP profile with the PEAP method and assign it in Authentication Methods Profile:

Click Apply and then save the configuration:
write memory
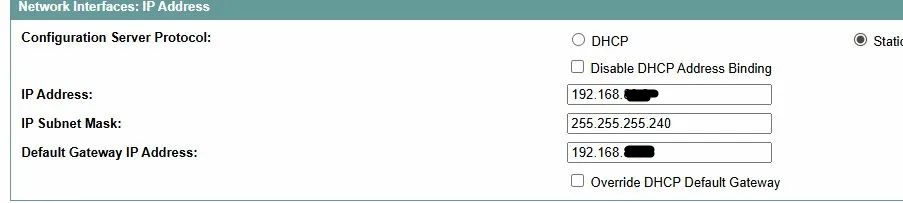
5.3 Checking terminal → NPS connectivity
Before testing authentication, check the terminal's network configuration:
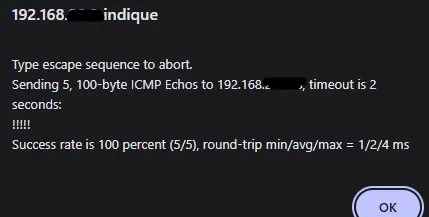
Then test the connectivity to the NPS server from the terminal's CLI. If a firewall rule is missing, the ping will fail:
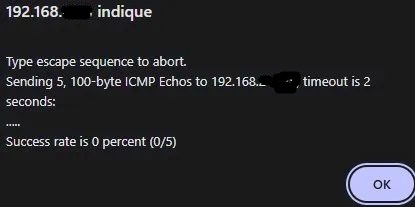
After correcting the firewall rule, the ping should return 100% success:
To debug RADIUS authentication in real time:
debug radius authentication
To view associated clients:
show dot11 associations
A client undergoing 802.1X authentication appears with the status EAP-Assoc — this is a sign that everything is working correctly.
Step 6 — GPO: automatic WiFi profile on laptops
The GPO will push the WiFi profile to all laptops in the PC_PORTABLES OU. Result: automatic connection without entering a password.
6.1 Create the GPO
In the Group Policy Management Console:
- Right-click on the PC_PORTABLES OU → Create a GPO object in this domain and link it here
- Name:
WIFI_ENTREPRISE
In the GPO security filtering:
- Keep
Authenticated Users(required for the computer GPO to apply) - Optionally add
GG_WIFI_RADIUSfor further restriction
> ⚠️ Caution: If you remove Authenticated Users and only set GG_WIFI_RADIUS, the GPO will not be applied—computer GPOs are applied with the machine account, not the user account.
6.2 Configure the WiFi profile
Edit the GPO → Computer Configuration → Windows Settings → Security Settings → Wireless Networks (IEEE 802.11)
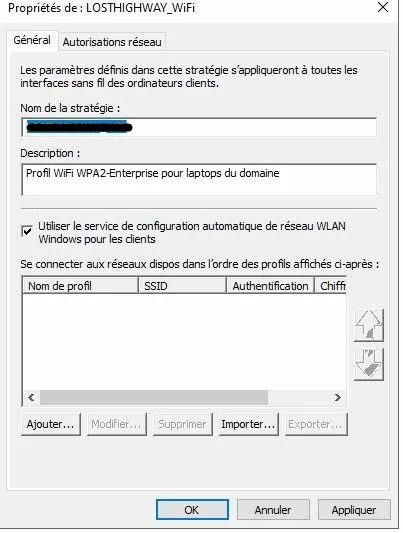
Right-click → Create a new Windows Vista or later policy
The created policy looks like this:
Click Add to create the SSID profile:
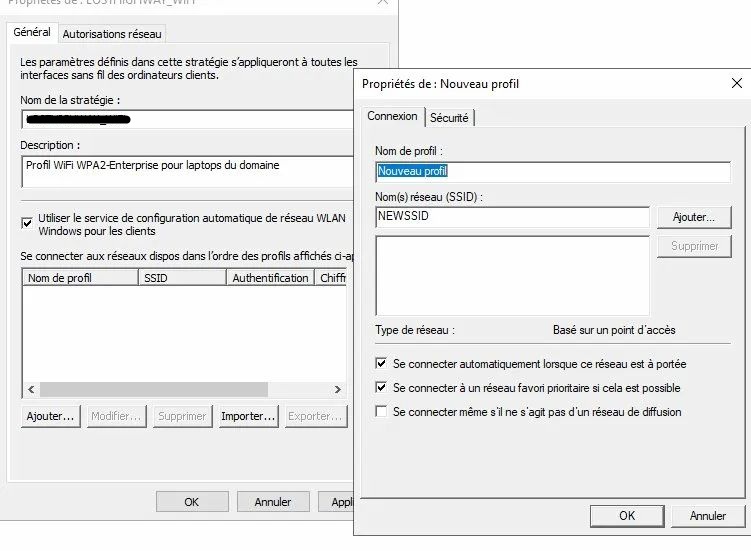
Connection tab:
- Profile name: the name of your SSID
- SSID: the exact name of your SSID (click Add)
- ✅ Connect automatically when this network is in range
- ✅ Connect to a priority favorite network if possible
Security tab:
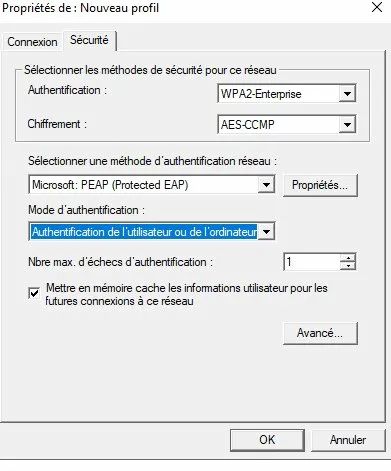
- Authentication:
WPA2-Enterprise - Encryption:
AES-CCMP - Method:
Microsoft: PEAP (Protected EAP) - Authentication mode:
User or computer authentication
Click Properties next to PEAP. The window opens with the list of trusted CAs:
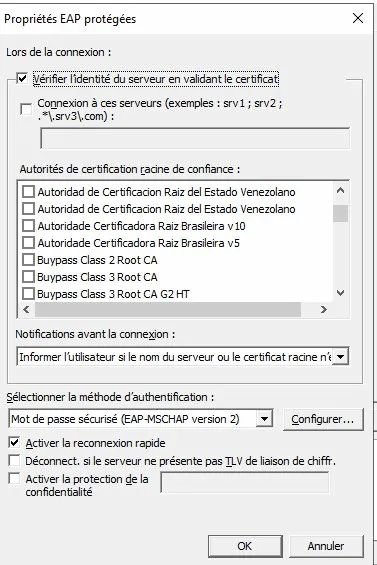
Configure as follows:
- ✅ Verify the server's identity by validating the certificate
- Connect to these servers:
SERVER-NAME-NPS.domain.local - Notifications:
Do not ask the user to authorize new servers - EAP method:
Secure password (EAP-MSCHAP version 2)
In the CA list, locate and check your internal CAs (check both if you have a root CA and a subordinate CA):
6.3 Force Ethernet preference over WiFi
In the same GPO → Computer Configuration → Administrative Templates → Network → Windows Connection Manager
Setting "Reduce the number of simultaneous connections to the Internet or a Windows domain" → Enabled → option: 3 - Prevent Wi-Fi connection when an Ethernet connection is available
Result: cable connected = WiFi inactive / cable disconnected = automatic WiFi connection.
Step 7 — Testing and validation
Apply the GPO
On a laptop in the PC_PORTABLES OU:
gpupdate /force
Verify that the GPO is applied:
gpresult /r
The WIFI_ENTREPRISE policy should appear in Applied Group Policy Objects.
Connection test
- Unplug the Ethernet cable
- Restart the laptop
- When logging in, observe the automatic Wi-Fi connection
NPS-side validation
In the Event Viewer on the NPS server → Windows Logs → Security:
| EventID | Meaning |
|---|---|
| 6272 | Access granted ✅ |
| 6273 | Access denied ❌ → check the ReasonCode |
Key fields to check in a successful 6272:
NetworkPolicyName: must display the name of your WiFi policyAuthenticationType: must displayPEAPEAPType: must displayEAP-MSCHAP version 2
Common errors and solutions
ReasonCode 66 — Authentication method not enabled
The matched NPS policy does not match the EAP method sent by the client. Check the order of NPS policies and the NAS Port Type conditions.
"No authenticator" on the laptop
The WiFi access point is not acting as an 802.1X authenticator. On Cisco Aironet, verify that Open Authentication with EAP AND Network EAP are checked, and that an EAP PEAP profile is assigned in AP Authentication. Here is the incorrect status to be corrected — the AP Authentication section with no profile assigned:
Invalid shared secret (Cisco)
Cisco Aironet access points do not accept the characters ?, $, +, [. The error appears as follows:

Use an alphanumeric secret with a maximum of 12 characters, at least for my generation of Aironet access points, which I admit are a little outdated.
GPO not downloading
Check that Authenticated Users is in the GPO security filtering. Computer GPOs apply with the machine account—if only GG_WIFI_RADIUS is present, the GPO will not apply.
Laptop without Ethernet port
Classic bootstrap problem: without Ethernet, it is impossible to retrieve the WiFi GPO. Solution: use a USB-Ethernet adapter temporarily to bring down the GPO.
Terminal not connecting to the NPS server
Check your inter-VLAN firewall rules (UDP 1812/1813) and test connectivity from the terminal CLI with a ping. See the screenshots in section 5.3.
Special cases
Laptops without a 5GHz WiFi card
Some entry-level WiFi cards (e.g., Realtek RTL8723DE) only support 2.4GHz and are limited to 72Mbits in 802.11n. If the card is on an M.2 or mini-PCIe slot, replacing it with a dual-band card card (Intel AC-7260/8260/9260) will solve the problem. If the card is soldered, a dual-band WiFi USB adapter is the only option.
Coexistence with an existing RADIUS VPN
If NPS already manages VPN authentication, make sure that the VPN policy has a NAS Port Type → Virtual (VPN) condition in its Conditions (not just in the Constraints). Without this, it will intercept WiFi requests before the dedicated policy.
That's it!
Your WiFi infrastructure is now secured with WPA2-Enterprise. No more shared PSK keys to manage, no more risk of a former employee retaining WiFi access—each connection is individually authenticated with AD credentials. Access revocation is done with a single click from Active Directory, and NPS logs allow you to track who connected, when, and from which terminal.
The same NPS infrastructure can be extended to secure Ethernet ports via 802.1X on your managed switches—but that will be the subject of a future article, or maybe not 😉