Passbolt Configuration and Security Tutorial
This tutorial covers the installation, configuration, and security of a Passbolt server: Documentation
Prerequisites
- A domain name/host name pointing to a server, or at least the ability to reach the server via a static IP address.
- A VM with at least 2 cores and 2 GB of RAM
- An SMTP server
- A functional NTP service to avoid GPG authentication issues
- Ubuntu Server 24.04 with LVM encryption
- Provision SSL certificates
It is important to use a clean server with no other services or tools already installed. The installation scripts could potentially crash and damage data.
VM configuration:

Notes
The minimal Ubuntu server configuration does not include the nano, ping, etc. packages.
Firewall rules:
Ports to open if configuring the VM firewall: (For our SMTP server: port 25 instead of 587)
Inbound rules:
| Protocol | Port |
|---|---|
| HTTP | 80 |
| HTTPS | 443 |
Outbound rules:
| Protocol | Port |
|---|---|
| HTTP | 80 |
| HTTPS | 443 |
| SMTP | 587 |
| DNS | 53 |
| NTP | 123 |
| HKPS | 11371 |
Installing Passbolt
1. Check the network configuration:
Here we have the yaml rendering of cloud-init, which should not be modified. It retrieves the network configuration applied during installation. For Ubuntu Server, systemd-resolved manages the DNS.
network:
  version: 2
  ethernets:
    ens18:
      addresses:
      - "static_ip"
      nameservers:
        addresses:
        - my_dns
        search:
        - my_zone
      routes:
      - to: "default"
        via: "my_gateway"
2. Installing the environment
Some packages may already be installed, depending on the version of Ubuntu you have installed.
- Update the system and install the dependencies:
- Access to an NTP server is essential for successfully creating GPG keys.
- The dialog package is required to display information correctly during the installation process.
- dns-utils to check the server's DNS information
sudo apt update
sudo apt install chrony dialog dnsutils -y
timedatectl set-timezone "Europe/Luxembourg"
Warning!
- If the dialog package cannot be found, add the universe repo
sudo add-apt-repository universe
Example error: NTP synchronization problem, do:
sudo chronyc -a makestep
systemctl daemon-reload
Provision SSL certificates
Create the folder
mkdir -p /etc/ssl
Copy the keys to the server (check access to the destination folder)
scp -r 'C:\path\to\your\folder' user@192.168.1.1:/chemin/de/destination
mv _.xxxxxxxxxx.chained.crt _.xxxxxxxxxx_private_key.key xxxxxxxxxx_ssl_certificate.cer /etc/ssl
Rename the certificates, easier to fill in during installation
mv _.xxxxxxxxxx.chained.crt xxxxx.chained.crt
mv _.xxxxxxxxxx_private_key.key xxxxx.key
mv xxxxxxxxxx_ssl_certificate.cer .xxxxxxcer
3. Installation
Step 1. Download our dependency installation script:
curl -LO https://download.passbolt.com/ce/installer/passbolt-repo-setup.ce.sh
Download our SHA512SUM for the installation script:
curl -LO https://github.com/passbolt/passbolt-dep-scripts/releases/latest/download/passbolt-ce-SHA512SUM.txt
Make sure the script is valid and run it:
sha512sum -c passbolt-ce-SHA512SUM.txt && sudo bash ./passbolt-repo-setup.ce.sh || echo "Bad checksum. Abandon" && rm -f passbolt-repo-setup.ce.sh
Install the official Passbolt Linux package
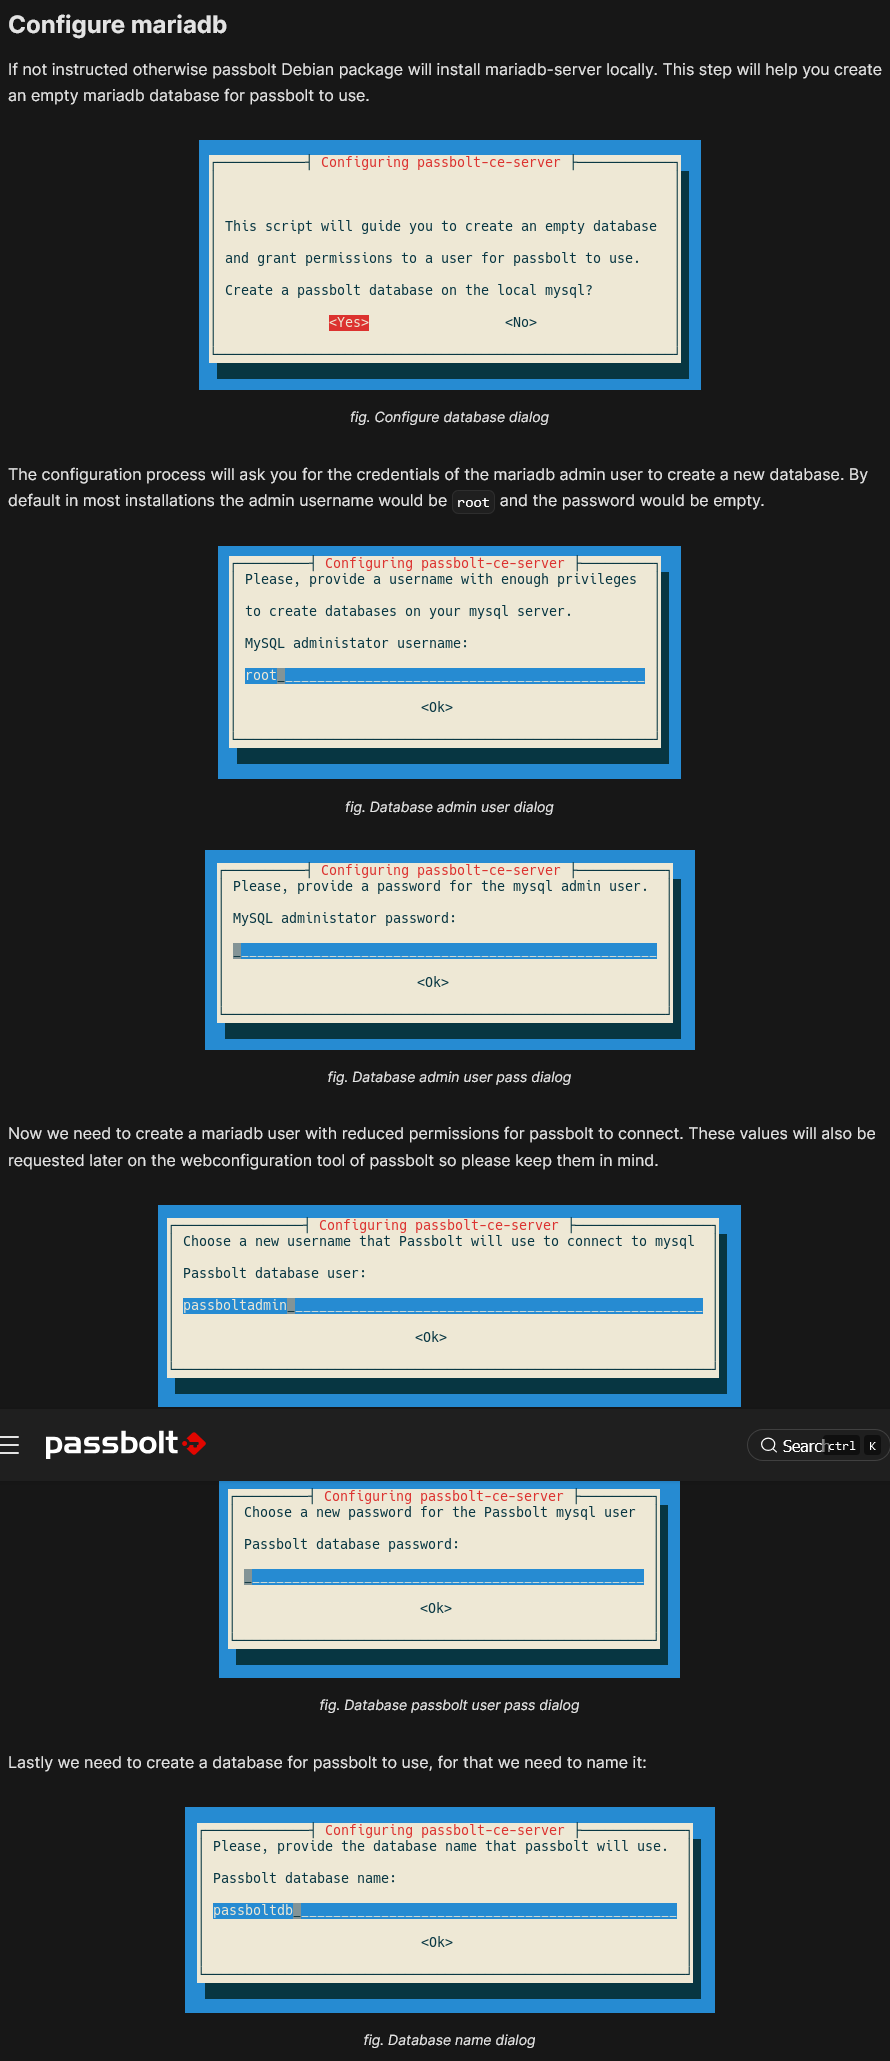
sudo apt install passbolt-ce-server
WARNING: the inputs to be filled in cannot be copied/pasted, so be careful.
To configure the Nginx web server, select "manual," then "yes" (make sure you have access to a folder containing your certificates if you plan to add them during installation). You can always add them later (select "manual" and "no" in this case).
Enter the necessary information when the following windows appear:
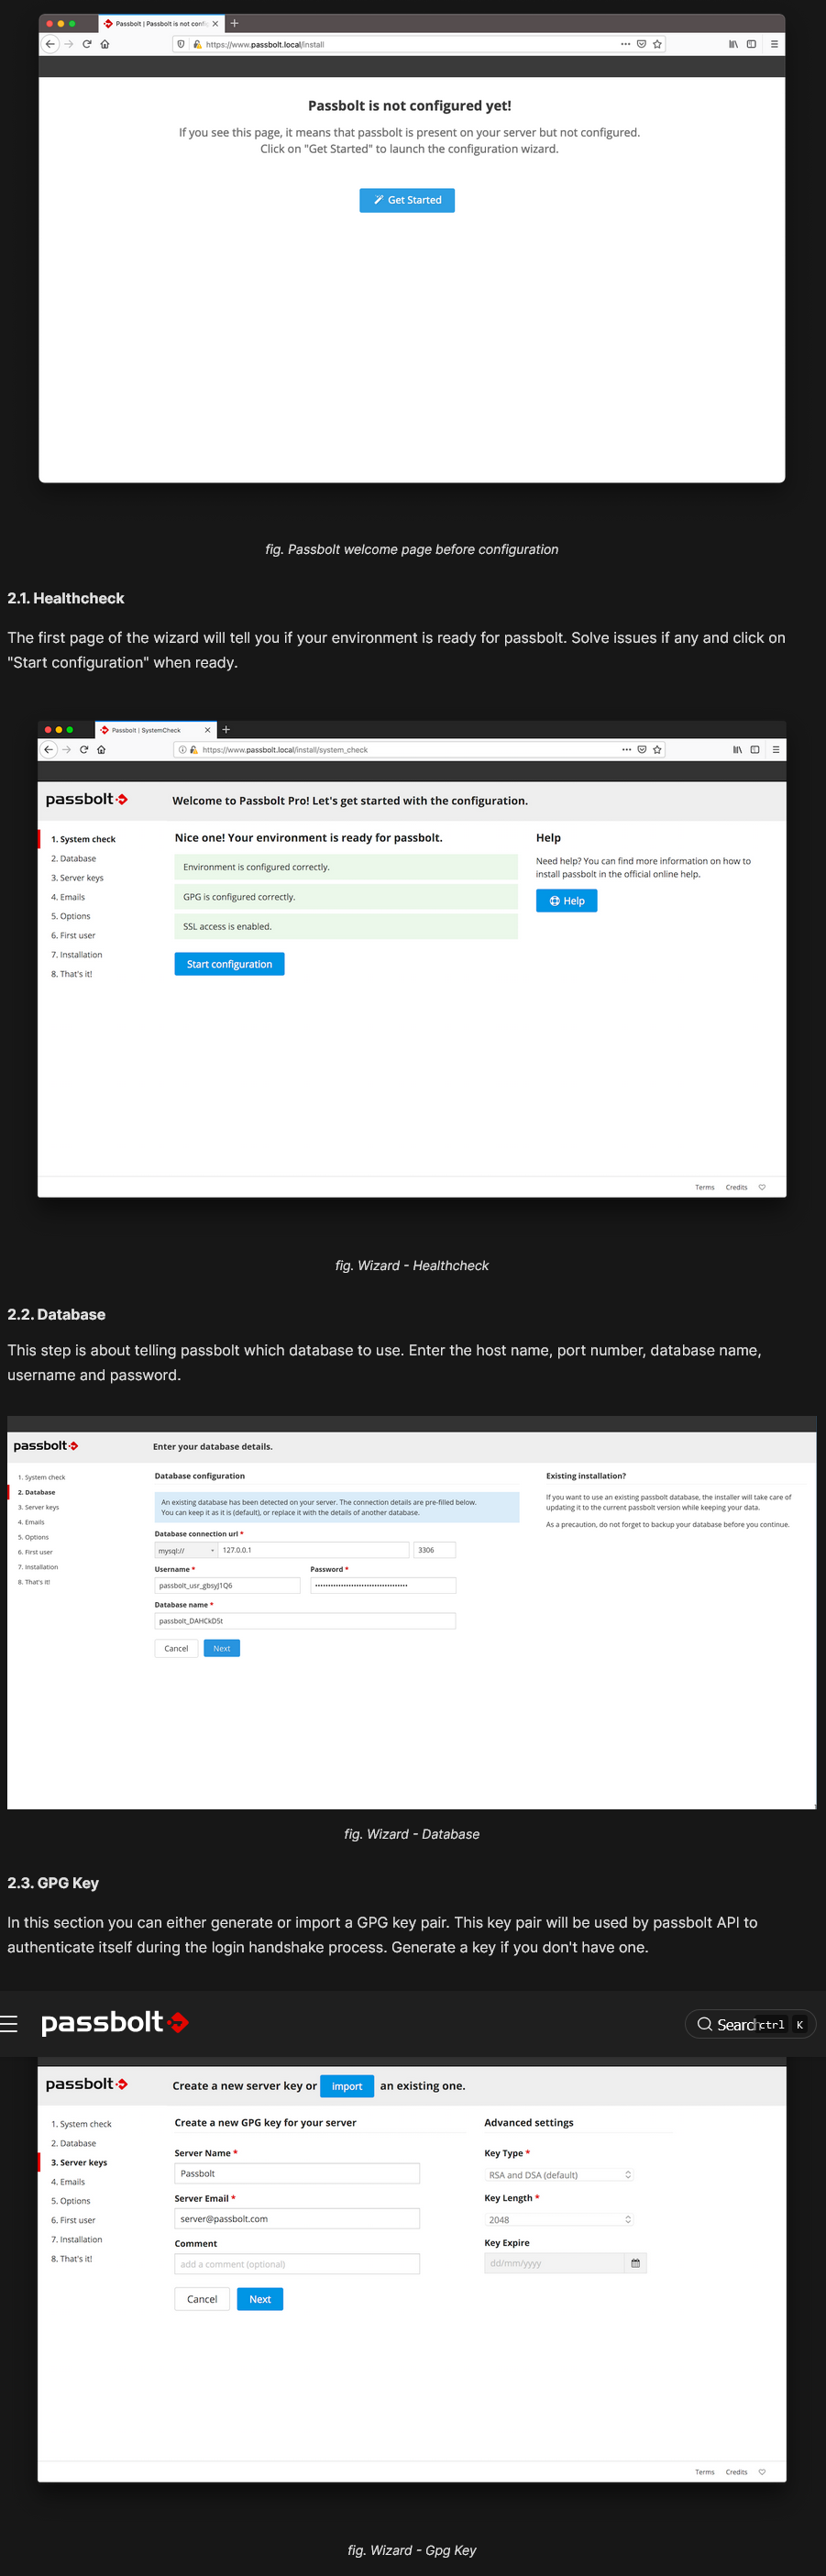
2. (NO LONGER NECESSARY SINCE THE UPDATE) After installation, if the default nginx page appears instead of Passbolt, you can delete the default pages to access it:
sudo rm /etc/nginx/sites-available/default
sudo rm /etc/nginx/sites-enabled/default
Passbolt Configuration
Configuration File
To modify the configuration files, you have two options: either unlock the root user or create a dedicated user, or use the following commands:
example: su -c 'nano /etc/passbolt/passbolt.php' www-data –shell /bin/bash
-
Edit the
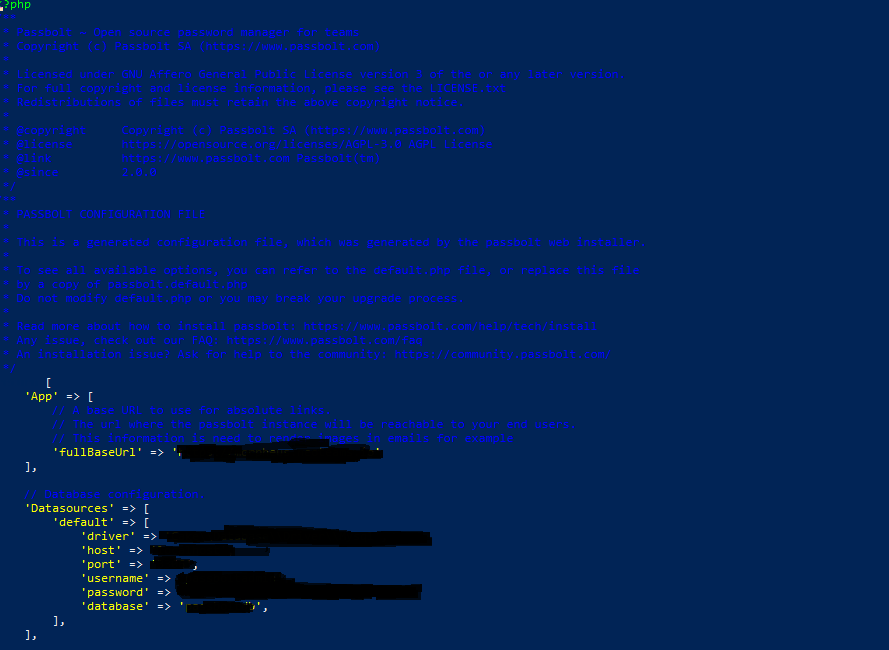
/etc/passbolt/passbolt.phpfile to define the basic parameters: -
Make sure that
App.fullBaseUrlis correctly configured (this is the absolute link that users will use to access their manager):
'App' => [
    'fullBaseUrl' => 'https://www.mon_serveur_passbolt.com'
]
Adding or modifying certificates after installation
- You have two options: either run the command
sudo dpkg-reconfigure passbolt-ce-serverand add the SSL certificates during the nginx reconfiguration, but you will need to enter the rest of your Passbolt information as you did during the initial installation, or edit the nginx configuration file:
sudo nano /etc/passbolt/nginx-passbolt.conf
The official guide: HTTPS Configuration
- If you import your certificate to the server, make sure to secure your folder, for example: sudo chown -Rf root:www-data /etc/nginx/ssl sudo chmod 750 /etc/nginx/ssl/ sudo chmod 640 /etc/nginx/ssl/.xxxxxxxx.chained.crt sudo chmod 640 /etc/nginx/ssl/.xxxxxxxx_private_key.key sudo chmod 640 /etc/nginx/ssl/_.xxxxxxxx_ssl_certificate_INTERMEDIATE.zip sudo chmod 640 /etc/nginx/ssl/xxxxxxxx_ssl_certificate.cer
If nginx is down after updating the certificates: systemctl restart nginx DOES NOT ALLOW YOU TO UPDATE ITS DAEMON do:
systemctl stop nginx
systemctl start nginx
SMTP configuration
- Configure the SMTP server (example with IONOS):
- Test with the command:
sudo -H -u www-data bash -c "/usr/share/php/passbolt/bin/cake passbolt send_test_email --recipient=mon_mail@domaine.com"
- If the SMTP port is blocked, check the port used by your server and the firewall.
Checks and Troubleshooting
Checking the Configuration
- Test the Nginx syntax:
sudo nginx -t
- Run a system health report:
sudo /usr/share/php/passbolt/bin/status-report
Force SSL
Either in the GUI options or via the configuration file:
- To force the use of SSL in
/etc/passbolt/passbolt.php:
'ssl' => [
    'force' => true
]
Securing the /etc/passbolt/jwt/ folder:
sudo chown -Rf root:www-data /etc/passbolt/jwt/ sudo chmod 750 /etc/passbolt/jwt/ sudo chmod 640 /etc/passbolt/jwt/jwt.key sudo chmod 640 /etc/passbolt/jwt/jwt.pem
Logs
Logs are available in /var/log/passbolt/.
Disable the SMTP endpoint
Set passbolt.security.smtpSettings.endpointsDisabled to 'true' in /etc/passbolt/passbolt.php.
Warning!!!
- You must ABSOLUTELY keep your recovery file. If, as an administrator, you lose this file, you will not be able to recover your database if you have lost your recovery file and your password.
CLI account recovery procedure
If you have been logged out of your account and need to recover it, you can use the following command:
sudo su -s /bin/bash -c "/usr/share/php/passbolt/bin/cake passbolt recover_user -c -u YOUR_EMAIL" www-data
Database Management (to be completed):
- To initialize the database, use a dump file if necessary:
mysql -u PASSBOLT_DATABASE_USER -p PASSBOLT_DATABASE < mysqldump.sql
- To manage database users and configure permissions:
-
Check the usernames and passwords in the
/etc/passbolt/passbolt.phpfile. -
If you encounter an error during the installation process, you can restart it using the following command:
-
dpkg-reconfigure passbolt-ce-server
If this command does not work and returns the error: "/var/cache/debconf/config.dat is locked by another process: Resource temporarily unavailable," you can target the process and kill it using:
fuser -v /var/cache/debconf/config.dat
kill
Resources:
Passbolt Ubuntu Server Installation Debian/Ubuntu manual HTTPS configuration