At first, the goal was simple: to add two disks to a ZFS raidz1 pool. No major migration, just a storage expansion. Except that the feature that allows this—raidz_expansion—is only available starting with ZFS 2.3, which is itself included starting with Proxmox 9. And since the server was running Proxmox 8.4, the logic was inescapable.
The Context
The server in question is an HP ProLiant DL360 G6, an old-timer but perfect for playing around with Proxmox. It runs Proxmox VE 8.4 as a standalone node, with a Proxmox Backup Server VM. Storage consists of a ZFS raidz1 pool made up of four 1 TB drives, and two additional drives had been waiting to be added for a while.
The reason for the delay? Well, other things to do, and when I finally decided to get to it, I was horrified to discover that raidz_expansion simply doesn’t exist in earlier versions of ZFS. Before ZFS 2.3, to add a disk to an existing RAIDZ, you had to create a new pool and migrate the data. A pain. Since ZFS 2.3, it’s native: you attach the disk, ZFS redistributes the data in the background, and the pool stays online throughout the entire operation.
Proxmox 9 comes with ZFS 2.3. You’ll need to migrate before expanding the ZFS pool.
First hurdle: the MegaRAID controller hiding the disks
Before even discussing Proxmox or ZFS, we had to resolve a hardware issue.
The server had just received two new LSI MegaRAID SAS 9240-4i controllers. And after the change, Proxmox could no longer see any ZFS pools. The result of a zpool import: nothing.
root@pve:~# zpool import
# ... complete silence
The cause is classic but tricky: the MegaRAID 9240-4i ships in RAID mode by default. It presents the physical disks as logical volumes to the OS, not as raw disks. ZFS needs to see the disks individually to read their metadata. In hardware RAID mode, it sees an opaque volume and can’t do anything.
The solution involves JBOD mode, which tells the controller to pass the disks transparently to the OS. Via MegaCLI:
# View the physical disks
MegaCli -PDList -aALL | grep -E "Slot|State"

# Enable global JBOD mode
MegaCli -AdpSetProp EnableJBOD 1 -a0

# Then set each disk to JBOD
MegaCli -PDMakeJBOD -PhysDrv[E:S] -a0
The 9240 controllers also offer a GUI that can be accessed by pressing CTRL + H during the POST messages when the server boots, but I forgot to take a screenshot—sorry
After rebooting, the disks appear as individual devices, and ZFS instantly recovers its metadata:
root@pve:~# zpool import
  pool: DATA-Raidz1
 state: ONLINE
The advantage of ZFS over traditional file systems: each disk stores the pool’s metadata in its own labels. No matter the path (/dev/sdX or otherwise), no matter the controller, ZFS scans and finds its way on its own—provided it’s given the raw disks.
Second detour: DMAR errors
Upon the next reboot, errors appear in the logs:
dmar: error dma pte for vpfn ...
Cause: the ProLiant G6 has VT-d enabled in the BIOS, and the old MegaRAID SAS controller does not play nicely with IOMMU. This isn’t just a cosmetic issue—this type of error can cause ZFS corruption during scrubs, via CKSUM errors.
Solution: disable VT-d in the BIOS. Not to be confused with VT-x, which is CPU virtualization and must remain enabled. VT-d handles PCI passthrough—useful only if you pass a physical device directly to a VM. In this specific case, with the MegaRAID in JBOD mode, VT-d serves no purpose and causes problems.
On a ProLiant G6, the option is located in: System Options → Processor Options → Intel VT-d. Disable it, reboot, and the DMAR errors will disappear.
Preparing for the Proxmox migration
Current Status
root@pve:~# pveversion
pve-manager/8.4.19/a68fb383814bb1e6 (running kernel: 6.8.12-29-pve)

root@pve:~# pve8to9 --full
The pve8to9 checklist reports 4 warnings, 0 failures:
- 1 VM currently running — the PBS, which we will stop before the upgrade
- systemd-timesyncd — to be replaced by chrony
- systemd-boot installed on legacy-boot — to be removed
- missing intel-microcode — to be installed
Resolving warnings
NTP — replacement with chrony:
apt install chrony
The installation automatically removes systemd-timesyncd. We configure chrony on the internal NTP servers:
cat > /etc/chrony/chrony.conf << 'EOF'
server 192.168.x.x iburst prefer
server 192.168.x.x iburst
driftfile /var/lib/chrony/chrony.drift
makestep 1.0 3
rtcsync
EOF

systemctl enable --now chrony
chronyc sources
Cleaning up systemd-boot:
apt remove systemd-boot
Intel microcode:
# Add non-free-firmware to the sources
sed -i 's/bookworm main contrib/bookworm main contrib non-free-firmware/' /etc/apt/sources.list
apt update && apt install intel-microcode
Cleaning up old kernels:
apt autoremove
Critical step: pin network interfaces
This is the most important step before any major migration to a remote node or into production. The 6.14 kernel included in Proxmox 9 may rename network interfaces—ens5f0 may become enp8s0f0 after a reboot. If this happens, the network configuration no longer matches the actual interfaces, and the node becomes inaccessible remotely.
Check the interfaces and their MAC addresses:
ip link show
cat /sys/class/net/ens5f0/address
cat /sys/class/net/ens5f1/address
And create udev rules to pin the names to their MAC addresses:
cat > /etc/udev/rules.d/70-persistent-net.rules << 'EOF'
SUBSYSTEM=="net", ACTION=="add", ATTR{address}=="xx:xx:xx:xx:xx:xx", NAME="ens5f0"
SUBSYSTEM=="net", ACTION=="add", ATTR{address}=="xx:xx:xx:xx:xx:xx", NAME="ens5f1"
SUBSYSTEM=="net", ACTION=="add", ATTR{address}=="xx:xx:xx:xx:xx:xx", NAME="enp3s4f0"
SUBSYSTEM=="net", ACTION=="add", ATTR{address}=="xx:xx:xx:xx:xx:xx", NAME="enp3s4f1"
EOF
After the post-migration reboot, all interfaces will have exactly the same names as before. The Proxmox bridges (vmbr0, vmbr1…) will be present without any changes.

The migration
The PBS VM is stopped. Open a tmux session — required for an SSH migration; the process must survive a disconnection:
tmux new -s upgrade
Update the bookworm → trixie repositories:
sed -i 's/bookworm/trixie/g' /etc/apt/sources.list
sed -i 's/bookworm/trixie/g' /etc/apt/sources.list.d/*.list
Verify before proceeding:
cat /etc/apt/sources.list
# deb http://ftp.fr.debian.org/debian trixie main contrib non-free-firmware
# deb http://ftp.fr.debian.org/debian trixie-updates main contrib non-free-firmware
# deb http://security.debian.org trixie-security main contrib non-free-firmware
# deb http://download.proxmox.com/debian/pve trixie pve-no-subscription
Run:
apt update && apt full-upgrade
For interactive configuration prompts: keep your own files (N) except for files you haven't modified. In particular, chrony.conf, which you just configured—answer N to keep the internal NTP configuration.
After the full-upgrade, check before rebooting:
root@pve:~# pveversion
pve-manager/9.2.3/d0fde103346cf89a (running kernel: 6.8.12-29-pve)
PVE 9.2.3 installed. The kernel displayed is still the old one—the new one will be loaded on reboot.
reboot
Post-migration result
root@pve:~# uname -r
7.0.6-2-pve

root@pve:~# zpool status DATA-Raidz1
  pool: DATA-Raidz1
 state: ONLINE
  scan: scrub repaired 0B in 00:09:59 with 0 errors
config:
        NAME                    STATE     READ WRITE CKSUM
        DATA-Raidz1             ONLINE       0     0     0
          raidz1-0              ONLINE       0     0     0
            ata-TOSHIBA_...     ONLINE       0     0     0
            ata-TOSHIBA_...     ONLINE       0     0     0
            ata-TOSHIBA_...     ONLINE       0     0     0
            ata-ST1000LM0...    ONLINE       0     0     0

Kernel 7.0.6-2-pve, ZFS pool intact, network interfaces unchanged. The PBS VM restarts normally.
ZFS pool upgrade
Before expanding the pool, enable the new ZFS 2.3 features:
root@pve:~# zpool upgrade DATA-Raidz1
Enabled the following features on 'DATA-Raidz1':
  redaction_list_spill
  raidz_expansion      ← this is the one we're interested in
  fast_dedup
  longname
  large_microzap
  block_cloning_endian
  physical_rewrite
raidz_expansion is enabled. We can now add disks to the raidz1 without rebuilding the pool.
Expanding the RAIDZ1
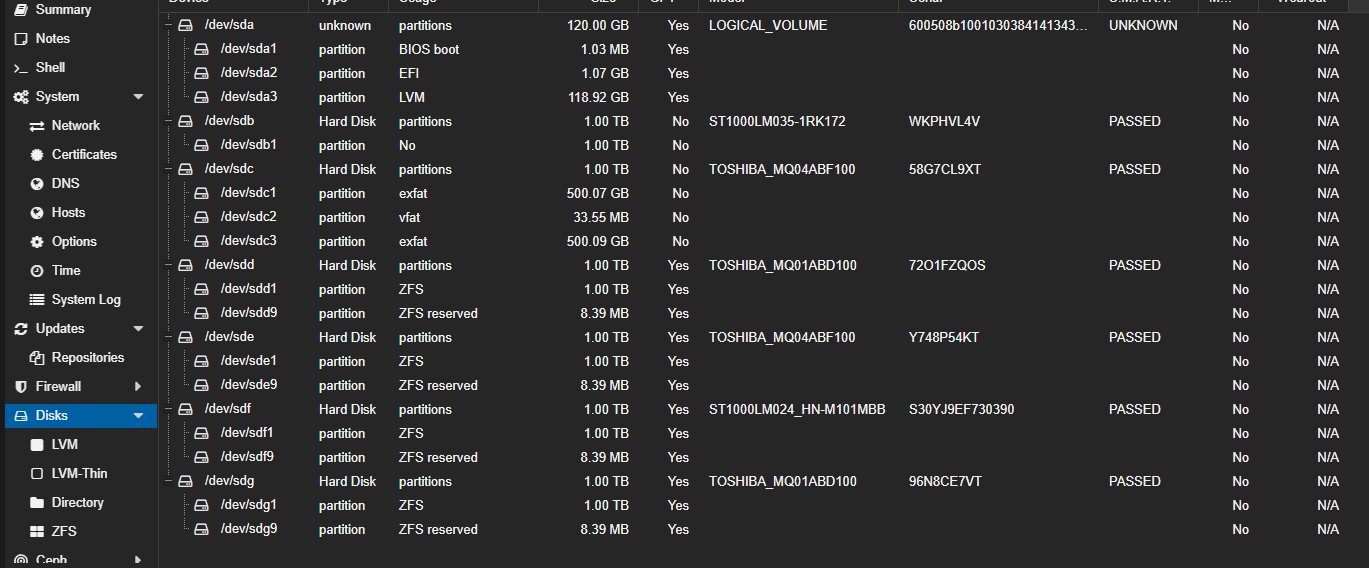
Preparing the disks
The two new disks were checked (lsblk, SMART passed), then wiped clean:
wipefs -a /dev/sdb
wipefs -a /dev/sdc
sgdisk --zap-all /dev/sdb
sgdisk --zap-all /dev/sdc
Scrub before expansion
There’s no way we’re expanding a pool without checking its integrity first:
zpool scrub DATA-Raidz1
watch -n5 zpool status DATA-Raidz1
Result: scrub repaired 0B in 00:09:59 with 0 errors. Pool is healthy, let’s proceed.
Adding disks
zpool attach DATA-Raidz1 raidz1-0 /dev/sdb
The expansion starts immediately:
expand: expansion of raidz1-0 in progress since ...
        1.98G / 49.2G copied at 102M/s, 4.03% done, 00:07:55 to go
config:
        raidz1-0        ONLINE
          ata-TOSHIBA... ONLINE
          ata-TOSHIBA... ONLINE
          ata-TOSHIBA... ONLINE
          ata-ST1000LM.. ONLINE
          sdb            ONLINE   ← new disk added
ZFS redistributes the existing data to the new disk while the pool remains online and accessible. No impact on the PBS VM running on it.
Once the first expansion is complete, we add the second disk:
zpool attach DATA-Raidz1 raidz1-0 /dev/sdc

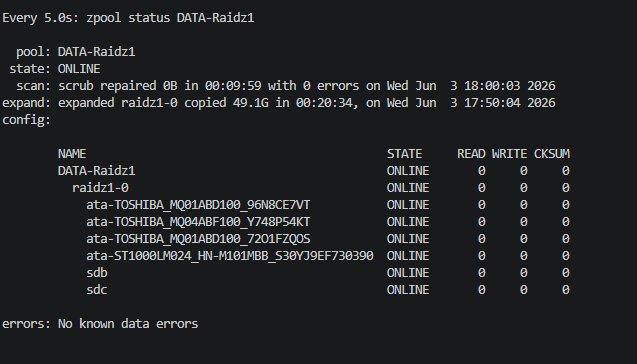
Final result
pool: DATA-Raidz1
state: ONLINE
expand: expanded raidz1-0 copied 49.1G in 00:20:34
config:
        NAME                    STATE
        DATA-Raidz1             ONLINE
          raidz1-0              ONLINE
            ata-TOSHIBA_...     ONLINE
            ata-TOSHIBA_...     ONLINE
            ata-TOSHIBA_...     ONLINE
            ata-ST1000LM0...    ONLINE
            sdb                 ONLINE
            sdc                 ONLINE

6 TB usable, 6-disk RAIDZ1, 0 errors. The pool grew from ~3 TB usable to ~5 TB usable, live, without rebuilding anything.
Key Takeaways
raidz_expansion fundamentally changes how ZFS storage is managed. Previously, adding a disk to an existing raidz was not possible—you had to create a new pool, migrate, and rebuild. This was ZFS’s main limitation compared to other solutions. This constraint no longer exists starting with ZFS 2.3.
The Proxmox 8 → 9 migration is smooth if you take the time to run the pve8to9 --full checklist and address any warnings before proceeding. The upgrade itself is standard—repos, apt full-upgrade, reboot. No surprises.
Network interfaces are the only real pitfall. Pinning them by MAC address with a udev rule before migration takes 5 minutes and potentially prevents you from losing access to a remote node.
**The MegaRAID controller in RAID mode hides the disks from ZFS.**This is not a bug; it is the intended behavior of a hardware RAID controller. The solution is JBOD mode—passing the disks transparently to the OS. This is worth noting if you’re repurposing HP/Dell/IBM server hardware with this type of controller.
Tested on HP ProLiant DL360 G6, Proxmox VE 9.2.3, kernel 7.0.6-2-pve, ZFS 2.3, LSI MegaRAID SAS 9240-4i.